
The Kitchen Reveal! – One Room Challenge Week 8
This post contains affiliate links. If you make a purchase through one of my links, I may receive a small commission at no cost to you. Full disclosure.
Past posts: Week 1 | Week 2 | Week 3 | Week 4 | Week 5 | Week 6 | Week 7
Be honest: did you think I'd actually finish this project in time? I wasn't so sure!! Eight weeks sounds like a long time, but in the scheme of home renovation, it's a blip!
But I'm so delighted to share that it's finished! Done! Beautiful! I'm excited to take you on a tour of the new space below. But first, let's take a look at the "before" shots, shall we?
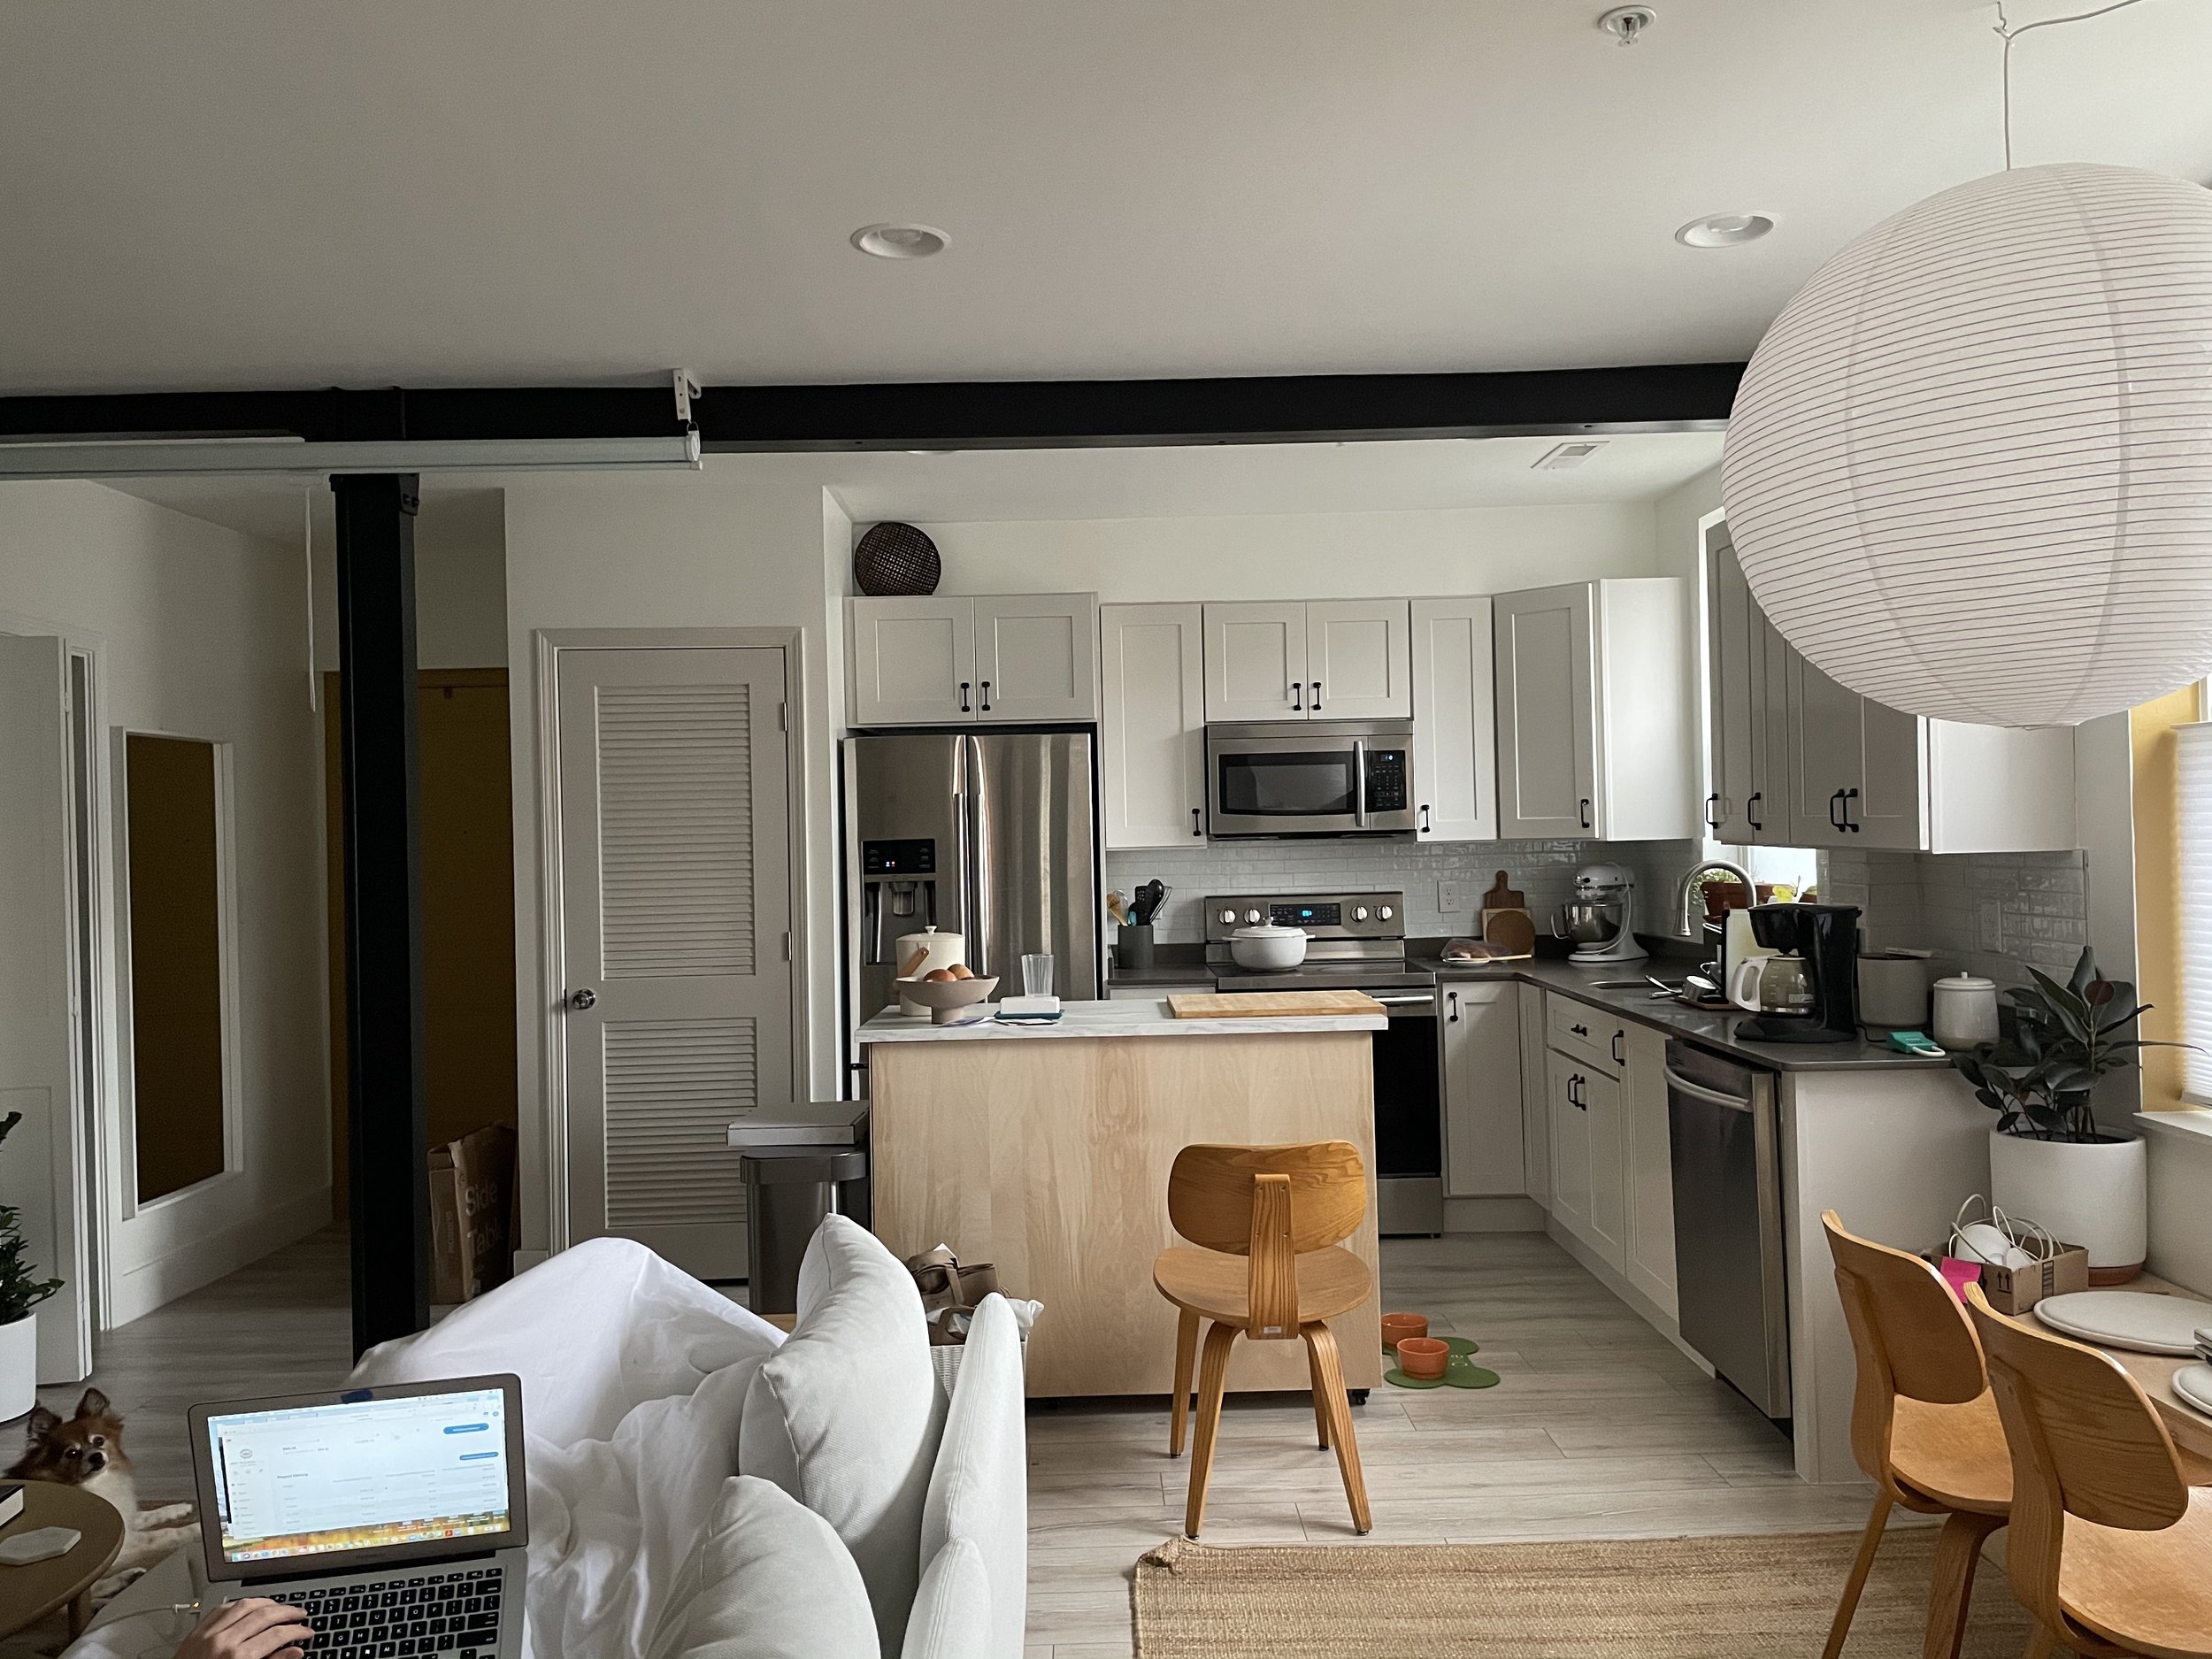
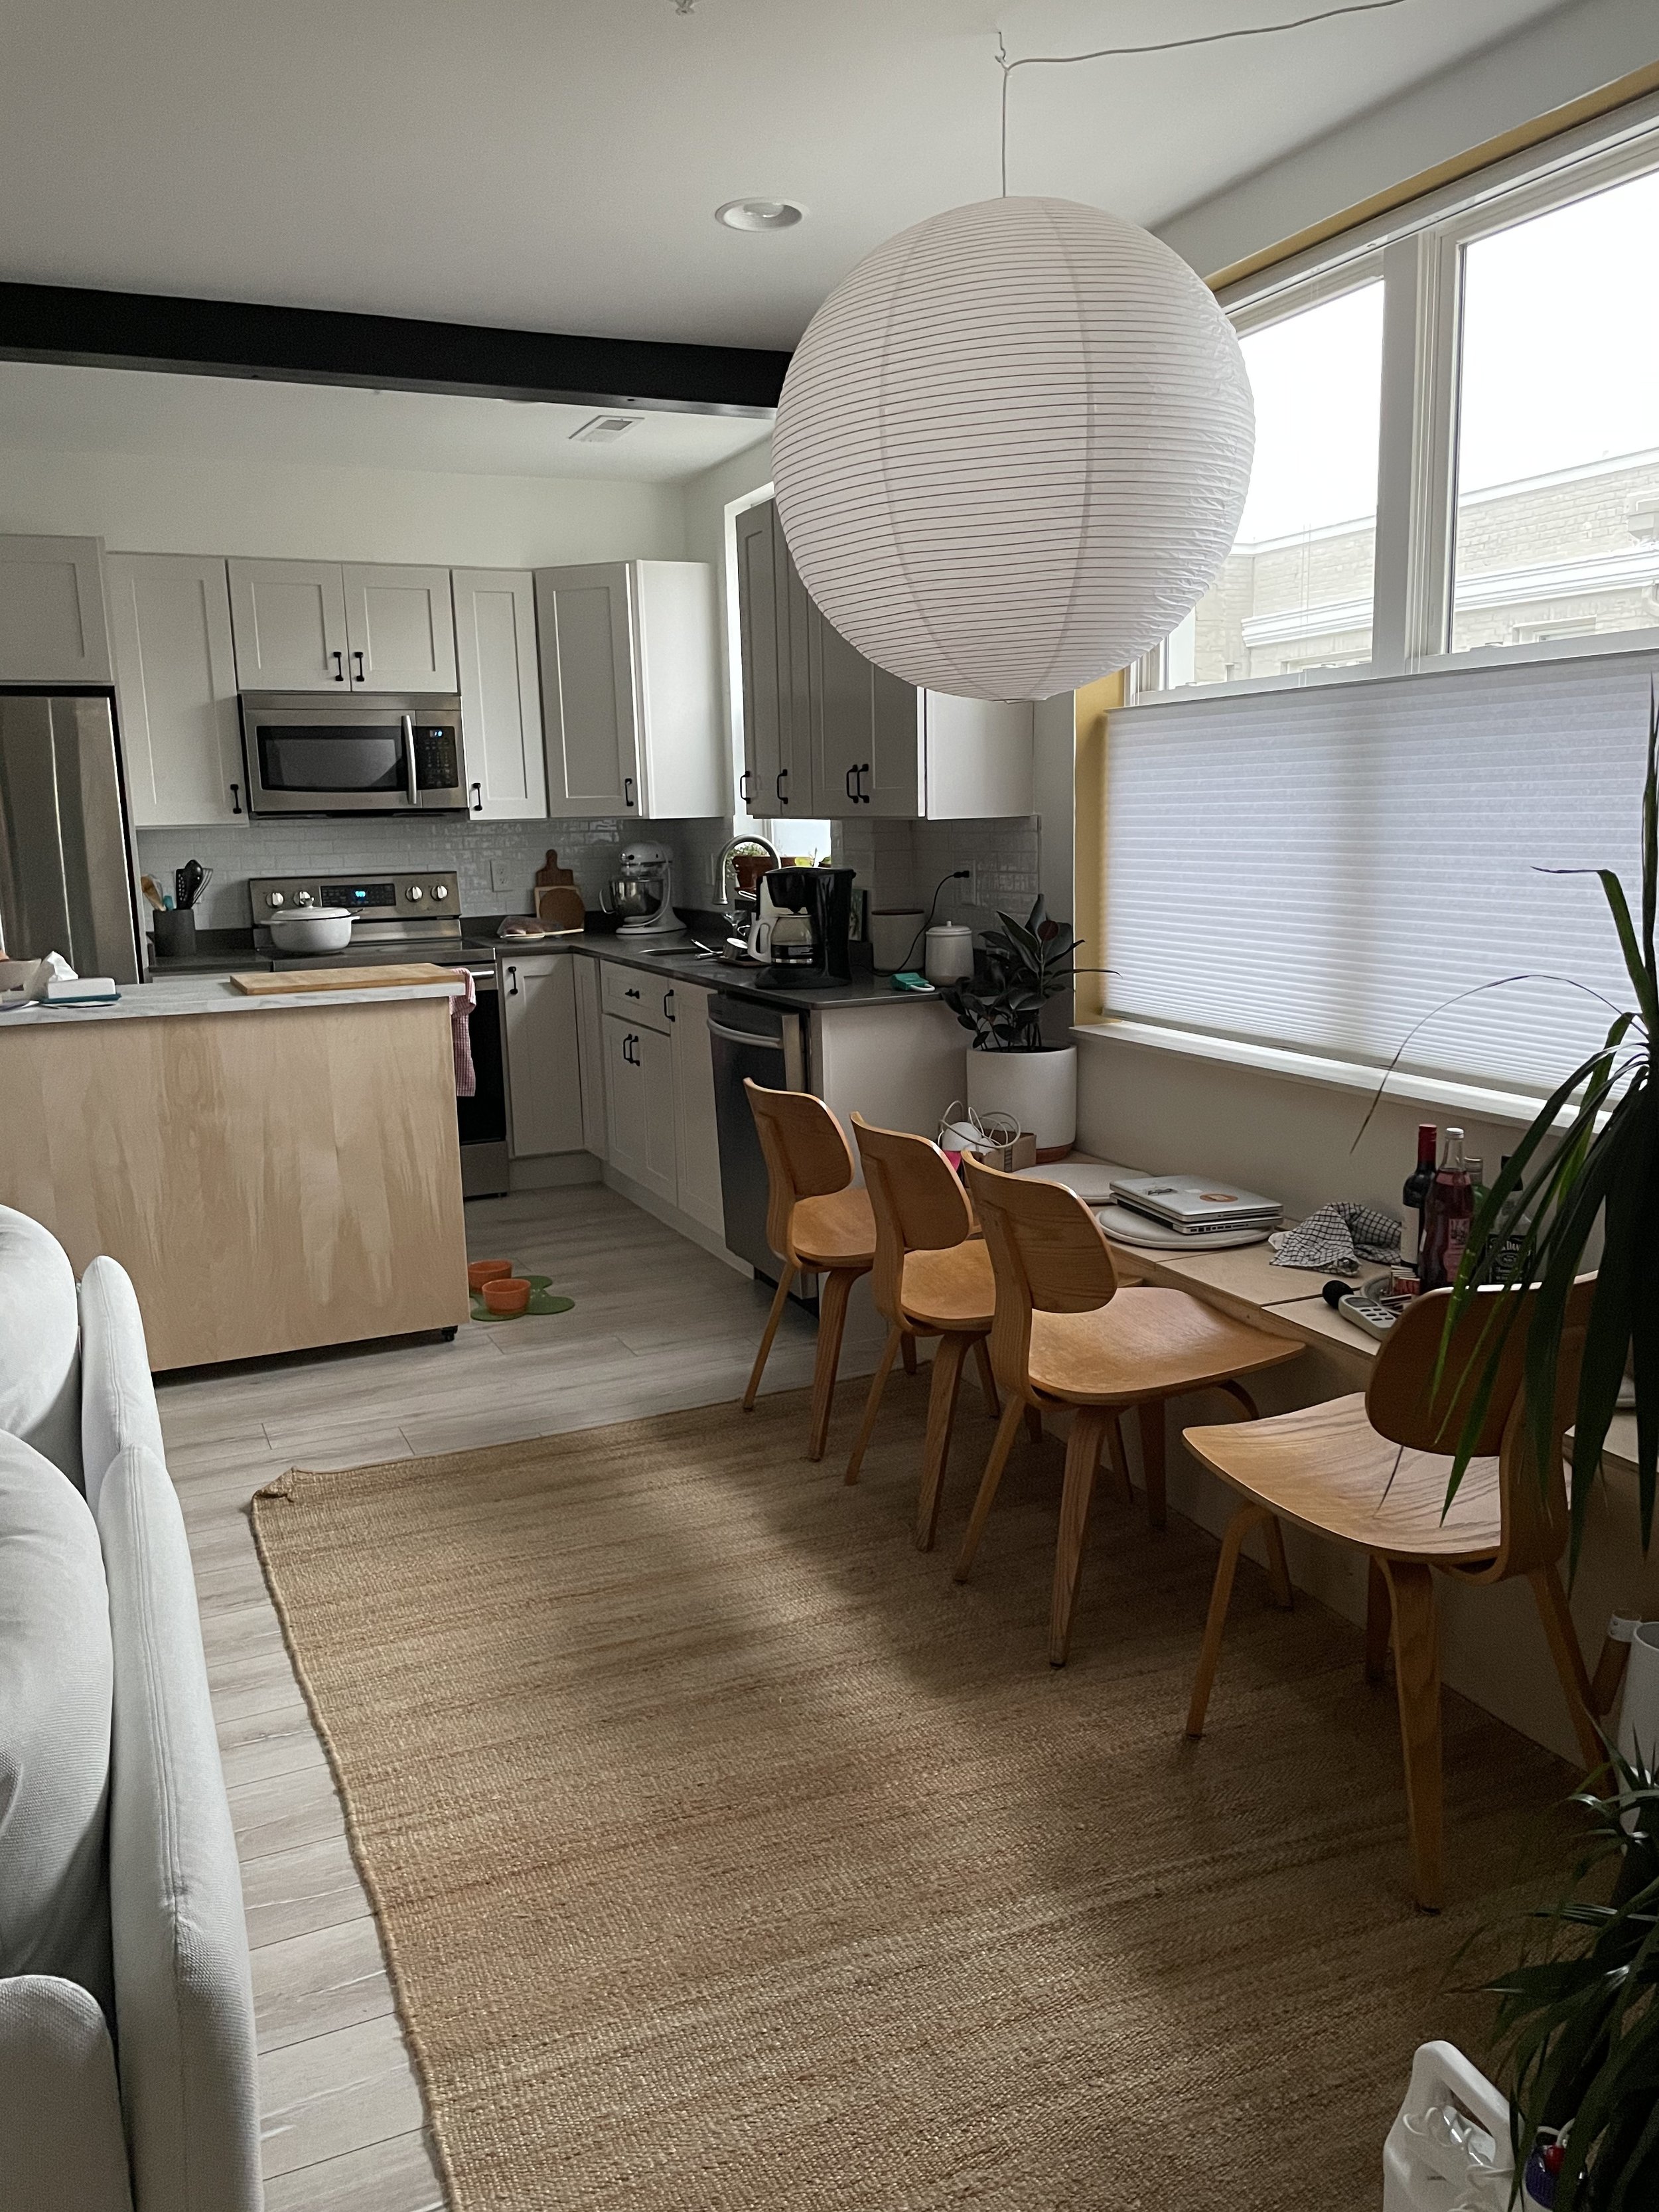
It was...fine. You might remember that the white backsplash tile was actually peel and stick that I added on top of the ugly glass mosaic tile. Overall, the space was fine but I never LOVED it. I'm happy to say that's changed! Drumroll...

It's here! The space that I built with my own hands!! Those of you who follow me on Instagram know that I pulled an all-nighter the night before we shot the photos. Literally – I took a 20-minute power nap and that was it. 😩 While I definitely don't recommend doing that, it was absolutely necessary to get everything done in time. I made some departures from my original inspiration, but that's part fo the fun!


Can you believe??
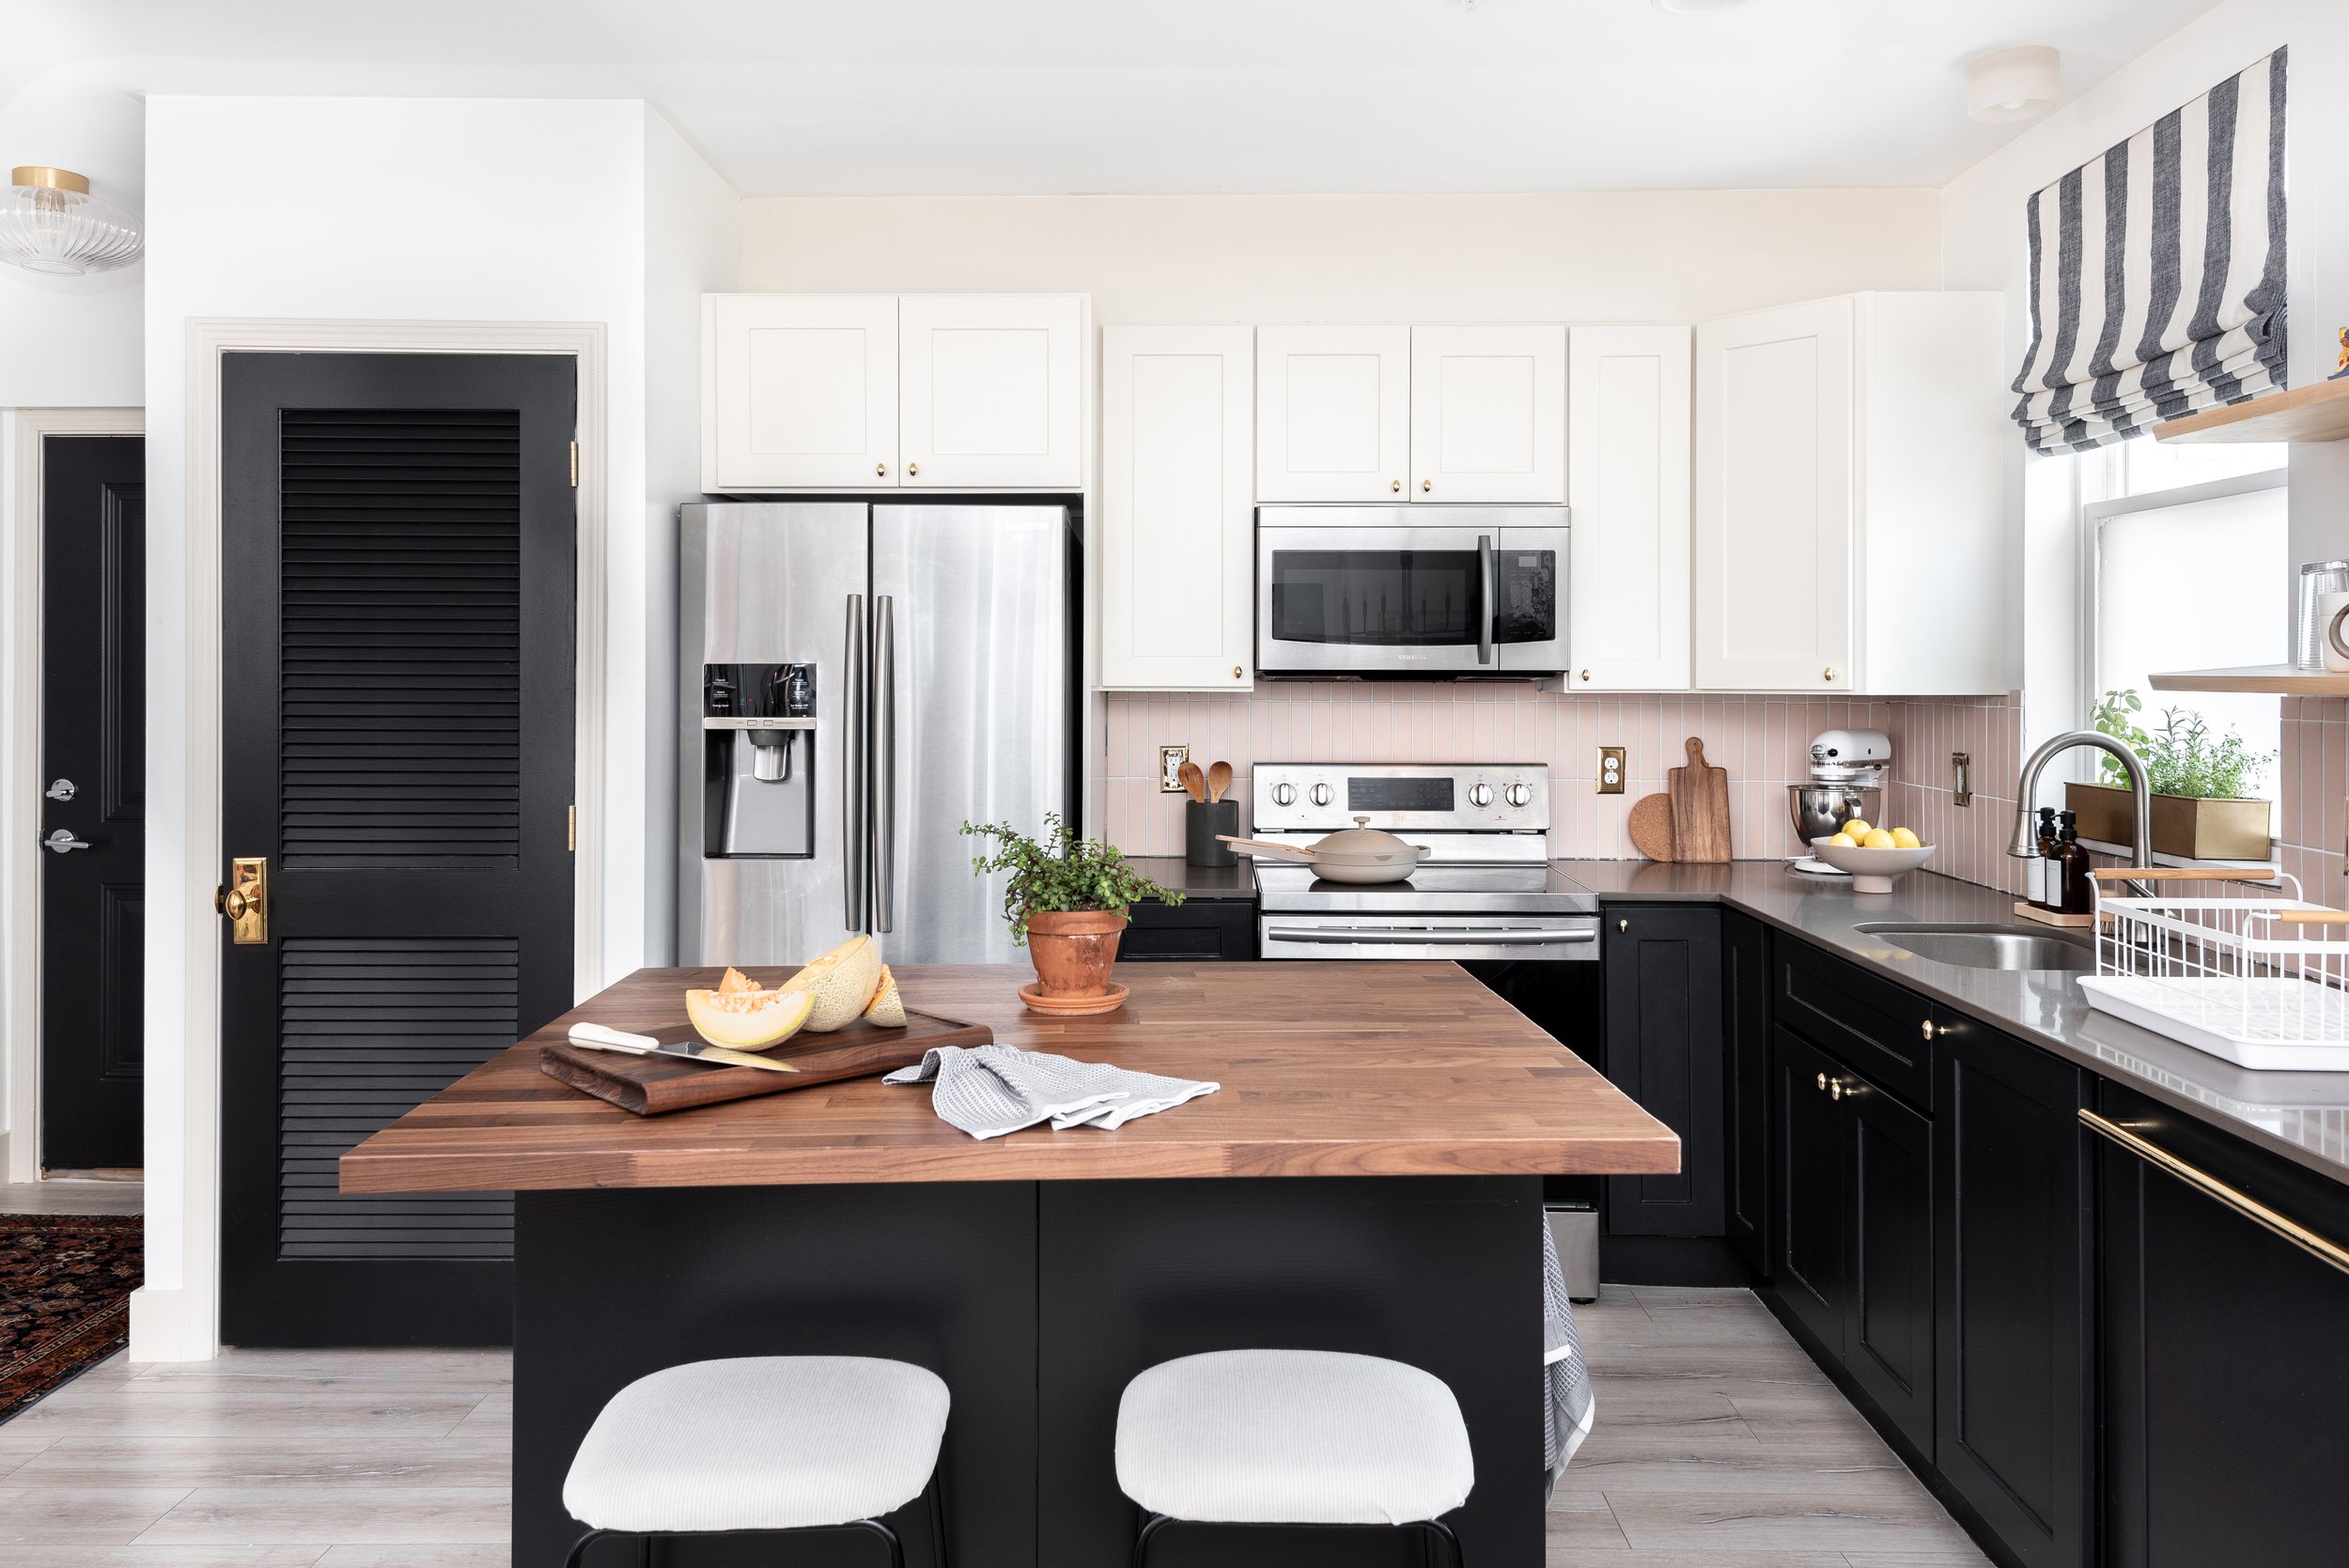
I am in awe! Let's start with the cabinet colors. I was on a budget for this project, and because everything was essentially new in here, I decided to work around certain elements. That included the countertops. I went with Kelly-Moore Yin Mist, an off-black, on the lowers because I figured the darker color would help disguise the counters. Mission accomplished!
Kelly-Moore is one of my sponsors, and I'm really glad that I got to use their paint. It was my first time with the brand, and the Durapoxy paint went on smooth and cured very well, which means it will hold up well to wear. On the uppers, I went with Kelly-Moore White Linen. It's a delightful creamy white, and at the last minute I actually decided to carry the color onto all of the trim around the doorways, plus on the wall above the upper cabinets, too. Since the kitchen, dining and entryway are all basically the same space, it helped create some continuity throughout.
Let's talk showstoppers.
During my all-nighter, there were a few moments when I paused for a moment because I saw the room come together before my eyes. Hanging my custom roman shades from Calico was absolutely one of those moments. I've written about this in previous ORC updates, but the team at the Arlington location was incredible to work with. They sent someone to measure the windows exactly, so the shades fit like they were made for the space (duh!). This linen blend stripe gives me sweet little bakery / cabana vibes and I'm super into the way they pulled everything together.
Y'all helped me choose a backsplash tile (sort of at the last minute after my initial vendor fell through), and I'm elated with the way Fireclay Tile's 2x8 tile in Tumbleweed looks in here! It adds a delightful pop of fun to what could have been an otherwise black and white kitchen. I'm a sucker for matte tile because it adds a more organic look to things. I've had a company crush on Fireclay for quite some time – they're a Certified B Corp and have great company values. The team was a delight to work with, the tile shipped fast (this is a quick-ship color!), and was simple to cut and install. Fireclay recommends working with a tile professional for the install, but my budget necessitated a DIY job. I'd say I did pretty good for my first time laying tile!


They say hardware is like the jewelry of the home. That couldn't be more true in this space! I chose Emtek's 1 1/4" egg knobs for the cabinets in unlacquered brass, which will age and patina over time (I love a good patina!). The appliance bar pull on the dishwasher (yes, that's an integrated dishwasher in the bottom right of the above frame!) and egg door knob with a 7" Wilshire Side Plate on the laundry room really helped class up the joint, too. If you have to touch something every day – like cabinet and door hardware – it might as well be a little luxe. Emtek's hardware just feels high quality, and it makes the whole room feel elevated.


Speaking of elevated...
Look up! Why YES that is an archway that I built to encase the intense black steel beam that ran through our house!! If I'm being honest, I hope to never work with drywall again. It was HARD work and my handiwork is definitely a bit iffy. While I'll probably have to do a skim coat eventually, I am floored with how much more "me" it made the space feel.
I grounded the entryway with this insane rug from my pals at District Loom (pssst! I'm a dL ambassador and code DOMMDOTCOM gets you 15% off!). I love vintage rugs and have used them throughout my homes over the years. They're shockingly great in high traffic areas because wool is naturally stain and water repellant, plus it's easy to clean (which is great because we have two dogs!).
The classy light fixture in the entryway is the Reba Flush Mount from Hudson Valley Lighting Group's Mitzi line. I actually landed on it because my original choice wouldn't have been in stock in time. HVLG supplied all three of the light fixtures that I added to the space. Our condo had can lights installed already, but dropping in light fixtures made the whole area feel more intentionally designed. I added the Loris Flush Mount above the sink, which provides some much-needed light, and the Brigitte Chandelier above the dining table.
The dining space

I actually want to eat here!! At the last minute (I mean it – this happened like, a week ago), I realized that my beloved Thonet chairs were just not working with all of the new updates. There were too many competing wood tones and it started to feel chaotic. So I reached out to Apt2B to see whether they could work a miracle. Can I tell you the Sylmar Side Chairs were delivered JUST as we were about to shoot the dining space?? How wild is that! The black frame of these chairs plays nicely with the Mitzi chandelier and the black on the lower cabinets.
One thing I'm really sad about not finishing in time – bench cushions. Calico supplied me with gorgeous linen blend fabric for a box seat cushion plus wall-mounted bolster cushions for the backrest. The foam inserts I ordered ended up being on backorder, so I'm saving the rest of that project for a little later. But I did use some of the lovely ticking stripe fabric from Calico to reupholster the counter stools at the island! The bar stools were an affordable find from Target, and the new fabric made them look special.
The island was a DIY entirely made of products from Ikea. I decided to paint the base the same color as the lower cabinets and doors, again helping to add continuity to the open space.
Finishing touches
Of course I wanted our kitchen to look great, but function was crucial too. The brushed nickel faucet we had in here before was a touch on/off version that the developer installed. I'm sure there are great versions of that kind of faucet out there, but it just wasn't for us. So I replaced it (the day after these photos were taken, sadly!!) with this incredible Joleena Semi-Pro Kitchen Faucet from Hansgrohe in matte black, again to play on all of the other black accents present in the space. Hansgrohe gifted me this faucet, and I love it so much more than the old pull-down. Right after I swapped faucets, Geoff came into the kitchen to wash his hands and his reaction was so pure ("Woah! This is instantly a million times better than what we had before. Great job, and thank you!"). Again, this is one of those pieces that feels high quality in your hands and is a delight to use.


Let's talk about the maple floating shelves, shall we? I reached out to Dennis Turbeville of Austen / Morris Furniture – he's a local brand-strategist-turned-woodworker (like, super local. We're pretty much neighbors!) to see if he'd be up for making something for my space. I love following along with him on Instagram because he shares lots of behind-the-scenes looks into his workshop on stories. Anyway, you may have noticed that we've got this lovely beam (again with the friggin' beams!) that protrudes from the middle of the kitchen wall. Obviously an off-the-shelf shelf wouldn't have worked here, and I really wanted something that would span the length of the wall. He totally crushed it!! How good does that maple look with all of my East Fork Pottery dinnerware?! I feel so grateful to Dennis for partnering with me on this project. He and I are planning a little Instagram live soon, so if you've ever wanted to ask about custom furniture (Dennis loves making case goods, like dressers and credenzas!) that will be a great opportunity to do so. 😉


I can't talk finishing touches without mentioning art! Minted graciously provided the artwork for the space, including this stunner of a canvas in the entryway. I love large-scale art in general, and in the entryway, it was necessary – right behind the Moody Floral Still Life canvas from photographer Katie Buckman is our fuse box, so obviously that didn't fit the vibe I wanted in here. The wall hook next to it was my grandmother's, and it feels special to have something of hers in here.
I love the mini corner gallery wall moment that's happening in the dining space! It adds fun pops of color (and coordinated nicely with my dress, lol). Minted framed all of the art (I chose the UV resistant options, which is also better at preventing glare) and I'm delighted with the quality of everything. I was able to just pop my art out of the box and boom! Art on the walls! This corner features Island Door and Boa Vista by Kate Baird, Peonies and Kumquats by Lynne Millar, and From a Table in Carolina by Jennifer Allevato.


And since organization matters a lot in a small kitchen, I incorporated a few pieces from Yamazaki Home in here, too. Their wire storage baskets, dish drainer rack, and cookbook stand all add necessary function and style. Thanks to the team at Yamazaki Home for sending me these last few touches!

I can't believe I actually pulled this off. I am in LOVE with our space now, and even though the project was stressful, I'm so glad that I did it. Not only did I teach myself a ton of really useful new skills – I taught myself what I'm capable of. And that's the real magic! I'm definitely planning to take it easy on the DIY for the next few weeks, but this project made me feel even more excited for what comes next.
I'd like to end with gratitude. A huge thank you to Linda Weinstein for all of the support throughout this project, and for choosing me to participate as a Featured Designer. Oh, and thank you for buying me dinner on one of those super late night project days!! 😭 Thank you to the team at Better Homes & Gardens, our media sponsor, for supporting dope content like this. Thank you to all of my product sponsors – I literally could not have done any of this without you!! And lastly, a major thank you to YOU, the folks who have cheered me on through all of the twists, turns, highs and lows of this project. It was your encouragement that got me through!!
I don't know about you, but I'm dying to see all of the other Featured Designer's spaces!! They're all linked below, so go ahead and browse.
Ariene C. Bethea | At Home With Ashley | Banyan Bridges | Bari J. Ackerman | Brit Arnesen
Brownstone Boys| Cass Makes Home | Dominique Gebru | Gray Space Interiors| Haneen’s Haven
Home Ec. | Nile Johnson Design | Pennies for a fortune | Prepford Wife | Rachel Moriarty Interiors
Sachi Lord | Susan Hill Interior Design | This Is Simplicite | Tiffany DeLangie | Victoria Lee Jones
Media BH&G | TM ORC
Photography by Tyler Hooks for Laura Metzler Photography.